Connecting to a Hub
Overview
This guide details the deployment and connection of the Mojaloop Payment Manager to a live hub using Docker Compose. It includes configuring environment variables, running the services, and verifying functionality via health checks and the UI.
Prerequisites
- Docker and Docker Compose: Installed on the deployment server.
- Payment Manager Repository: Cloned or downloaded with a
docker-compose.ymlfile supporting the portal profile.
https://github.com/pm4ml/on-premise-deploy.git
- Hub Access: Credentials and endpoint details from the hub operator.
- Network Access: Localhost or server IP accessible on ports
4010,8081, and other service-specific ports.
Step-by-Step Guide
1. Configure Environment Variables
Set the following environment variables in a .env file or directly in docker-compose.yml. These are tailored to your DFSP and hub configuration.
Common Environment Variables
- DFSP_ID: Sets the Digital Financial Service Provider (DFSP) identifier.
- Example:
dfsp-2
- Example:
Management API Environment Variables
- AUTH_CLIENT_ID: Specifies the Client ID or DFSP ID used for authentication.
- Example:
dfsp-2
- Example:
- AUTH_CLIENT_SECRET: Defines the secret key used for authentication with the authorization server.
- Example:
uvghb1OMl5l9vMXTvu2hp04rAExRjRS4
- Example:
- HUB_IAM_PROVIDER_URL: Sets the Identity and Access Management (IAM) provider URL.
- Example:
https://example.global
- Example:
- MCM_SERVER_ENDPOINT: Defines the endpoint URL for the Mojaloop Connection Manager (MCM) server.
- Example:
https://mcm.server.global/pm4mlapi
- Example:
- CALLBACK_URL: Specifies the Virtual Machine domain name.
- Example:
https://pm4ml.example.com
- Example:
- WHITELIST_IP: Specifies the public IP range of the VM that is whitelisted for system access.
- Example:
106.215.0.0/16 - Ensures secure access by limiting the IP range.
- Example:
SDK Scheme Adapter Environment Variables
- API_TYPE: Defines the API format for message processing.
- Example:
iso20022
- Example:
- GET_SERVICES_FXP_RESPONSE: Configures the test use for transfers which need currency conversion.
- Example:
test-fxp
- Example:
- PM4ML_ENABLED: Enables Payment Manager for Mojaloop (PM4ML) functionality.
- Example:
true
- Example:
- SUPPORTED_CURRENCIES: Specifies the supported currencies.
- Example:
MWK
- Example:
2. Verify Environment Variables
- Open the
.envfile and confirm all values match the expected configuration. - Check for typos in sensitive fields.
3. Run Payment Manager with Docker Compose
Navigate to the directory containing docker-compose.yml and start the services with the portal profile:
docker-compose --profile portal up -d
4. Verify Running Containers
Check the status of all containers:
docker-compose ps
Expected running services include:
experience-apifrontendkeycloakmanagement-apimojaloop-testing-toolkitprometheusredissdk-scheme-adaptersim-backendvault
5. Verify Payment Manager Health
Test the /health endpoint:
curl http://localhost:4010/health
Expected response:
{"status":"ok"}
If the response fails, check logs:
docker-compose logs experience-api
6. Verify Payment Manager UI
Open a browser and navigate to:
http://localhost:8081/transfers
Expected result: The Payment Manager UI loads successfully.
7. Port Mappings
Below are the key port mappings for deployed services:
- experience-api:
0.0.0.0:4010->3000/tcp, 4016->3000/tcp - frontend:
0.0.0.0:8081->8080/tcp - keycloak:
0.0.0.0:8080->8080/tcp, 8443/tcp - management-api:
0.0.0.0:9000->9000/tcp, 9050->9050/tcp - mojaloop-testing-toolkit:
0.0.0.0:4040->4040/tcp - mojaloop-testing-toolkit-ui:
0.0.0.0:6060->6060/tcp - prometheus:
0.0.0.0:9090->9090/tcp - redis:
0.0.0.0:6379->6379/tcp - sdk-scheme-adapter:
0.0.0.0:4000->4001/tcp, 4002/tcp - sim-backend:
0.0.0.0:5050->5050/tcp, 5051->5050/tcp - sim-backend-ui:
0.0.0.0:6061->6060/tcp - vault:
0.0.0.0:8233->8233/tcp
Troubleshooting
- Health Check Fails: Ensure port
4010is exposed andexperience-apiis running. - UI Unreachable: Confirm port
8081is mapped and thefrontendservice is active. - Port Conflicts: Verify that the listed ports are not in use by other applications on your server.
- Container Errors: Check logs with:
docker-compose logs <service-name>
Checking Onboarding Status Using the Connection Health Dropdown
Overview
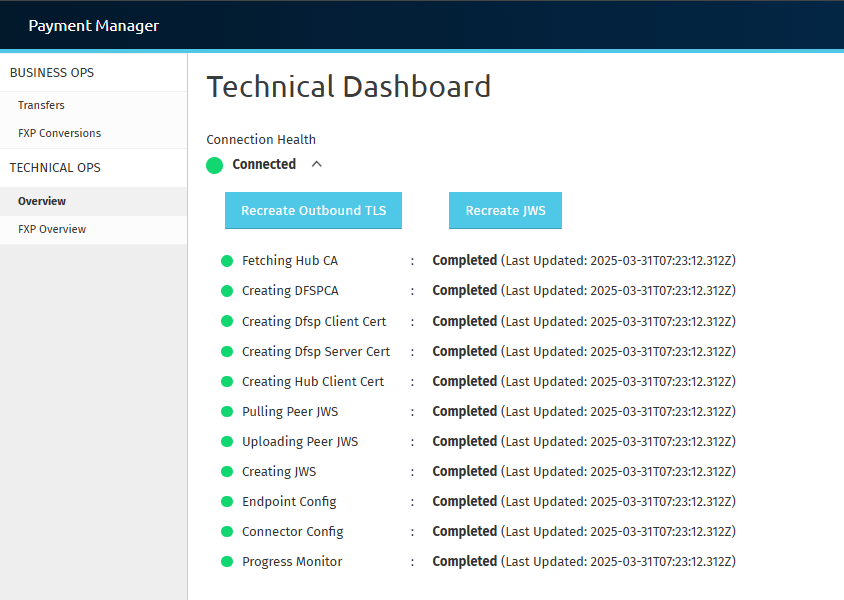
When connecting the Mojaloop Payment Manager to a live hub, the system performs several steps to establish the connection. This includes fetching certificates, managing security credentials, and configuring communication endpoints. You can monitor the progress of this process using the Connection Health dropdown in the Payment Manager UI.
The dropdown lists 11 steps, called Connection Health States, each with a traffic light indicator reflecting its status. The Connection Health Summary at the top represents the overall Onboarding Status.
Step 1: Open the Connection Health Dropdown
- Log into the Payment Manager UI.
- Locate the Connection Health dropdown (typically on the technical dashboard page at
http://localhost:8081/techdashboardor your server’s designated URL). - The dropdown label displays the Connection Health Summary, showing the overall Onboarding Status with a traffic light indicator.

- Click the dropdown to expand and view all 11 Connection Health States, each with its own status and timestamp.
Step 2: Understand the Traffic Light Indicators
Each status has a traffic light indicator with the following meanings:
| Status | Indicator | Meaning |
|---|---|---|
| Pending | ⚪ (Grey) | The step has not started. |
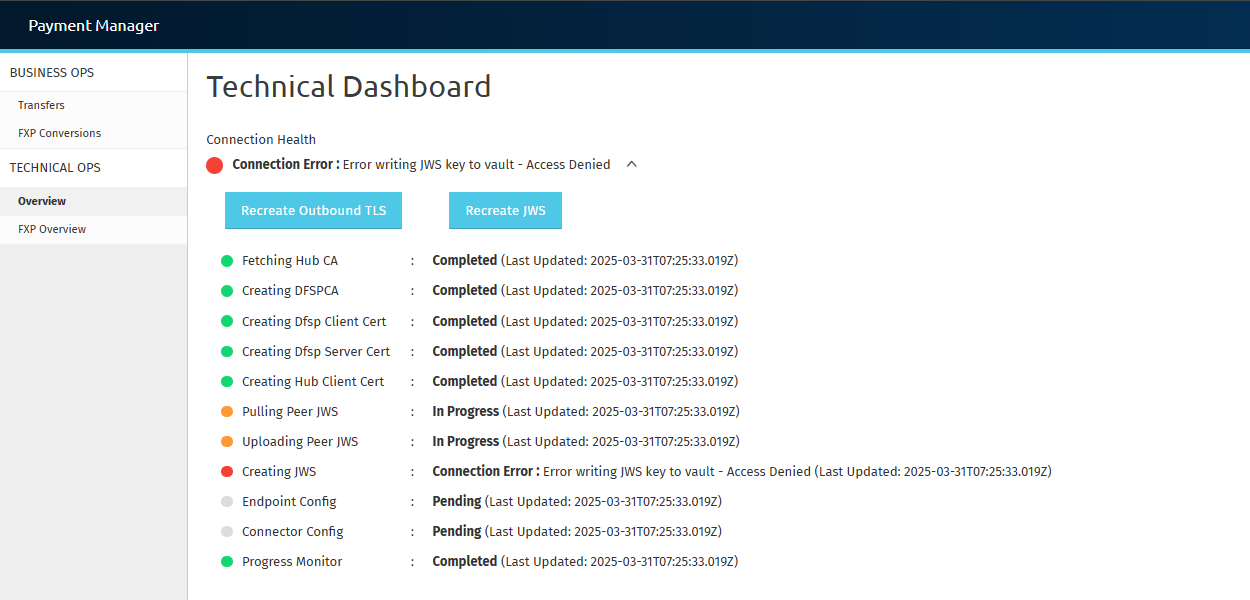
| In Progress | 🟠 (Amber) | The step is currently executing. |
| Completed | 🟢 (Green) | The step has successfully finished. |
| Connection Error | 🔴 (Red) | The step has failed, with an error message. |


Step 3: Connection Health Status Descriptions
The system runs through the following 11 statuses:
- Fetching Hub CA: Retrieves the hub’s security certificate.
- Creating DFSP CA: Creates a security certificate for your organization.
- Creating DFSP Client Cert: Generates a client certificate for authentication.
- Creating DFSP Server Cert: Creates a server certificate for secure communication.
- Creating Hub Client Cert: Generates a client certificate for the hub.
- Pulling Peer JWS: Downloads the hub’s security certificate (JWS cert).
- Uploading Peer JWS: Uploads your organization’s security certificate (JWS cert).
- Creating JWS: Generates and stores your JWS certificate.
- Endpoint Config: Sets up your communication endpoints.
- Connector Config: Configures the connector for message routing.
- Progress Monitor: Tracks overall connection progress.
Each status includes a Last Updated timestamp,

which indicates the most recent time that the system updated or modified the step. This helps users determine if a process is actively running, completed recently, or has been stalled for an extended period. If a status remains unchanged for too long, manual intervention may be required to troubleshoot potential issues.
Step 4: Review the Connection Health Summary (Onboarding Status)
The Connection Health Summary provides an overall onboarding status with a traffic light indicator:
| Status | Connection Summary Text | Indicator | Meaning |
|---|---|---|---|
| Pending | Pending | ⚪ (Grey) | All statuses are pending. |
| In Progress | Connecting... | 🟠 (Amber) | The process is ongoing with some statuses pending, in progress and completed. |
| Completed | Connected | 🟢 (Green) | All statuses have successfully completed, and the connection is established. |
| Connection Error | Connection Error | 🔴 (Red) | At least one status has failed. |


Onboarding Summary in the Navbar
In addition to the Connection Health dropdown, the Onboarding Summary is also displayed in the navbar.
This allows users to monitor the current status at a glance without opening the dropdown.


How It Appears in the Navbar
- The summary text is displayed on the right side of the navbar.
- The color of the ligt indicator changes based on the onboarding status, similar to the Connection Health Summary.
- ConnectionName dynamically reflects the hub or DFSP being onboarded.
| Status | Indicator | Connection Summary Text | Meaning |
|---|---|---|---|
| Pending | ⚪ (Grey) | Pending connection to: ConnectionName | All statuses are pending. |
| In Progress | 🟠 (Amber) | Connecting to: ConnectionName | The process is ongoing with mixed statuses. |
| Completed | 🟢 (Green) | Connected to: ConnectionName | All statuses have successfully completed. |
| Connection Error | 🔴 (Red) | Error connecting to: ConnectionName | At least one status has failed. |
This ensures that users remain informed about the onboarding process even while navigating other sections of the Payment Manager UI.
Step 5: Identify Errors Using the Error Description
If any status is Red (Connection Error), an error message will be displayed next to the failed step and in the Connection Health Summary. In case of multiple errors, only the first error will be shown in the summary, while all errors related to their respective statuses will be shown in the dropdown. Examples include:
- Error writing JWS key to vault - Access Denied.
- Error configuring endpoint - Connection refused.
To resolve an error:
- Review the error message next to the failed step.
- Take appropriate action based on the message.
- Retry the process if applicable.
Step 6: Use the Recreate Buttons to Revoke and Recreate Certificates
The dropdown includes two buttons:
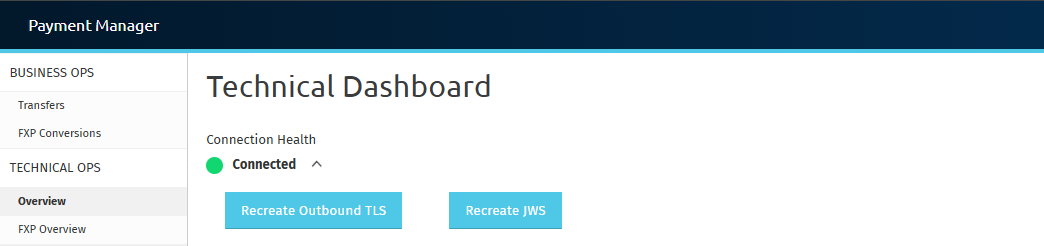
Recreate Outbound TLS Button
- Revokes and recreates TLS certificates.
- Affects: Fetching Hub CA, Creating DFSP CA, Creating DFSP Client Cert, Creating DFSP Server Cert, Creating Hub Client Cert.
- Use case: Updating TLS certificates for security policy changes or if you think certificates are contaminated.
Recreate JWS Button
- Revokes and recreates the JWS certificate.
- Affects: Pulling Peer JWS, Uploading Peer JWS, Creating JWS.
- Use case: Updating JWS certificates for security enhancements or if you think certificates are contaminated.
To use either button:
- Click the desired Recreate button.
- A modal window will prompt you to enter a reason for the recreation (e.g., “Security policy update” or “Certificate contamination”).
- Submit the reason to proceed with certificate recreation. This ensures an audit trail for certificate changes.

These buttons can be used at any time to refresh your security setup.